|
This is a special Bahro cave that they constructed for Yeesha. Its location is a complete mystery. We know that the other Bahro cave is located in the ceiling of Rudenna cavern because our KI devices told us so in the past, but the hourglass cave does not register on a KI at all. The upper part is similar to the Rudenna cave.
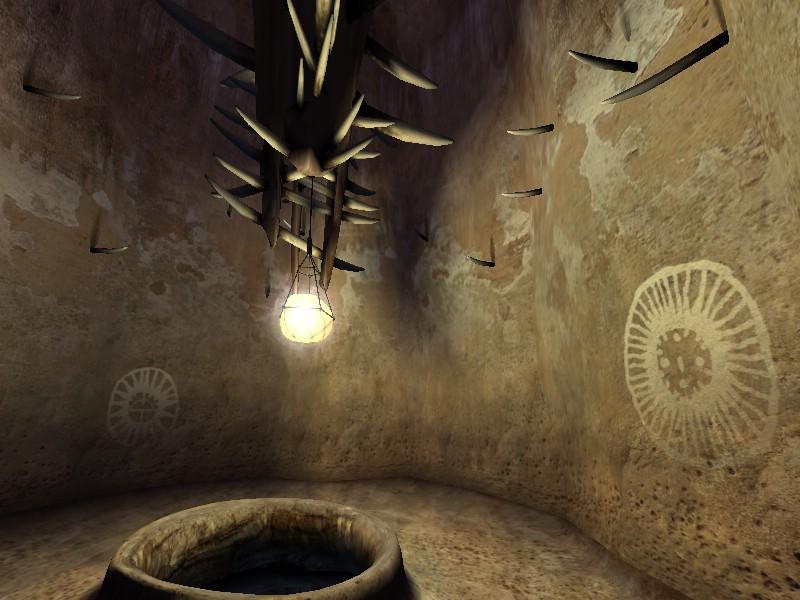
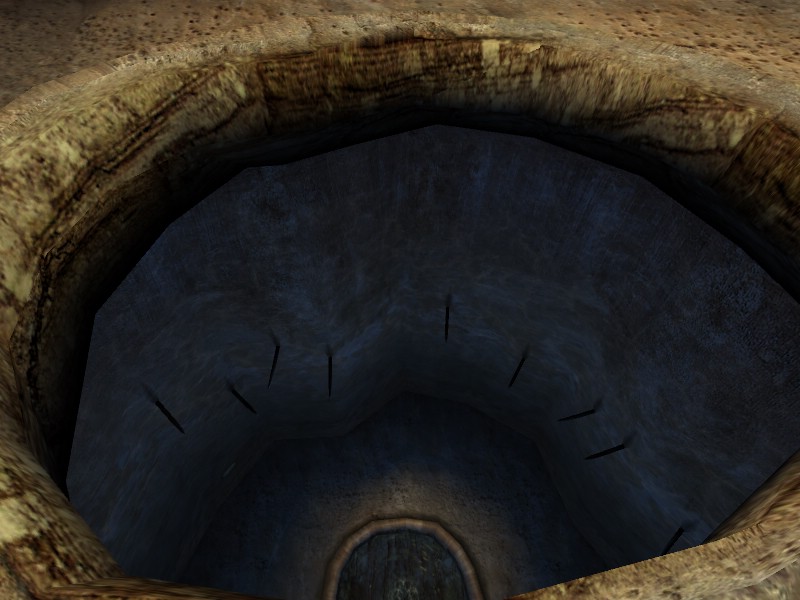
However, the hole in the floor does not drop into a cavern. Rather, it opens into a lower cave chamber with a pond in the center that contains the same algae that live in the D'ni lakes.
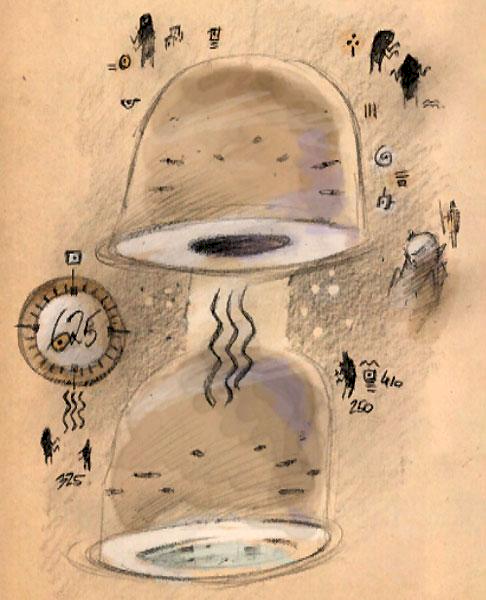
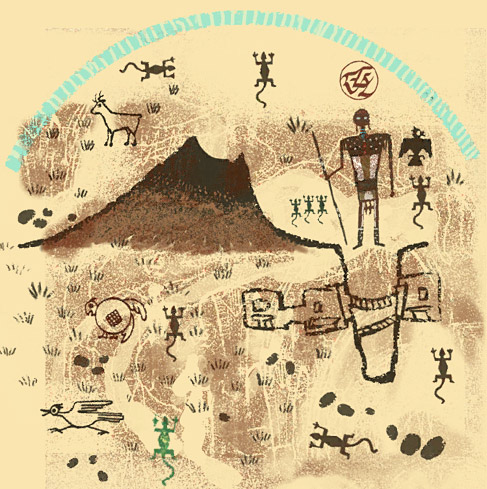
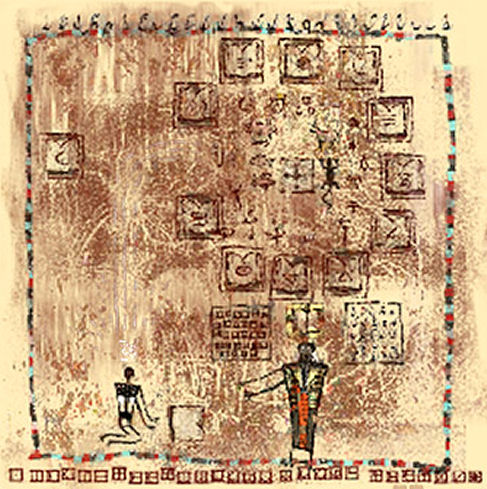
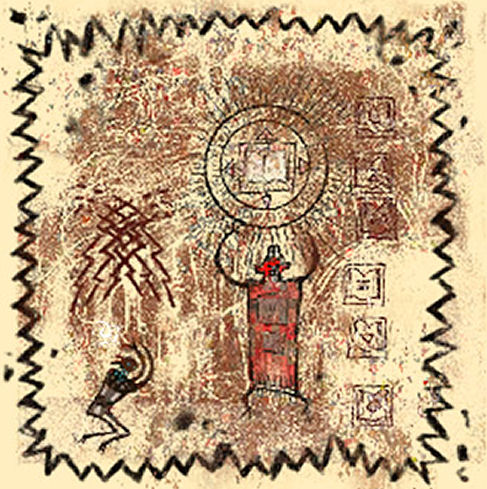
This picture is from Kadish's office in Ahnonay, and shows the cave. It was left by Yeesha in the days when it was possible for a single person to drop a pellet and view the cave; the number "625" is a measurement in D'ni time, and was the delay between linking a pellet in the upper chamber and it falling into the pool in the bottom chamber. In this case, about 15 minutes. Whatever method she used to delay the drop is no longer working, so now the pellet falls immediately and you have to already be in the lower chamber to see the wall glyphs.
No one has yet found a confirmed explanation of what the other numbers written in a smaller size might mean, although they might be Er'cana oven settings. They read 410, 325, and 250. The other symbols and pictographs are also unexplained. However, the dark figures represent the Bahro, and the symbols are their form of writing. Many other examples of Bahro script can be seen in the Age of Noloben. The lighter colored figure on the right side of the image appears to be the typical Bahro figure for Yeesha.
The petroglyphs:
When visiting the lower half of the hourglass cave, most people are focused on copying the Cleft viewer settings and do not notice that there are seventeen petroglyphs on the walls. They are like the viewer settings in that they only appear in the light given off by a dissolving food pellet.
The petroglyphs chronicle important events in Yeesha's life beginning from when she leaves Tomahna on her journey of self-discovery. When Dr. Watson followed Yeesha's Journey in 2006, he discovered a series of notebooks that Yeesha left behind in the Great Shaft. Entries in some of them cover many of the events shown in the petroglyphs, so the story the seventeen-glyph sequence covers is better documented than any of the other Bahroglyphs found in the caverns or Ages.
In 2006, an explorer named Brett Middleton conducted his own
studies of the Hourglass cave glyphs, based on work done by the Bahroglyph
Study Group. He used their methodology and many of their
preconceptions whick led him into a number of erroneous conclusions, but his analysis is detailed and imaginative.
One mistake he made was to call Yeesha’s
monogram a mandala. His definition of mandala was "a decorative form of D'ni
writing, usually presented in a circular frame, that joins the letters of a name or word through overlapping and shared strokes. The
mandala may be set within a decorative border. (Yeesha's mandala is sometimes
set within a border decorated by books, the spiral hand, and the desert bird.)
To the best of my knowledge, the term "mandala" was first applied to
this form of writing by BladeLakem in the DLF forums
in June 2004."
In reality, a mandala, which translates as "circle", is a spiritual
symbol from the Hindu religion that is intended to represent the cosmos. In common
use, a mandala is a circular geometric pattern. It has nothing to do with writing. Another difference is that he tends to call the Bahro identification mark the "weeping eye" or the "crying eye", instead of the BSG's "mourning eye".
A monogram is "a motif made by overlapping or combining two or more letters or other graphemes to form one symbol", and that is exactly what Yeesha's name glyph does.
I'm going to quote from his study and then give my own interpretations or corrections afterward. However, I have changed all instances of the word "mandala" to "monogram" to avoid perpetuating that mistake. Brett's study is contained in the darker gray boxes.
BC1-BC4: Life in the Cleft
Bahroglyph BC1: Yeesha leaves home.
There is little difficulty in
making a complete interpretation of this panel. The staff-bearing figure on the
right has Yeesha's name in monogram form overhead. Yeesha's name is readable in
D'ni script, and we have seen this monogram in many locations, beginning with
the wall at the bottom of the ladder leading down from the Journey Door in the
Cleft. The figure with the staff is also found beneath the Cleft, and the
combination of symbol and glyph identify Yeesha beyond doubt. The two figures
holding hands on the left represent Yeesha's parents to a high degree of
certainty, as confirmed by similar representations of Atrus and Catherine in
the Bahroglyph sequence found inside the caldera of the Volcano (VC1-VC11).
The monogram above Atrus and Catherine does not yet have a
confirmed reading. Most D'ni linguists believe it is the word "home"
written in "D'ninglish" (an English word
written in D'ni script). |
In AD 1832, when Yeesha was seventeen, she left Tomahna in an attempt to find herself. Atrus and Catherine are there to
say farewell. My own speculation is that she spent a period of time wandering
around North America before she eventually returned and settled down in the
Cleft. During that period, she would have traveled into what is now Utah and
seen Newspaper Rock, a Native American pictograph site. Yeesha left a copy of
sections of the Newspaper Rock glyphs in Eder Kemo.
The monograms in the image are Yeesha's name above her figure, and what appear to be "ehlm" or "ehom" above her parents. Either way, it's not the word "home" in English as Brett reported.
She wrote about that time in one of her journals which she left in the Great Shaft:
Alone. There is a powerful conjunction between the in and the out, the beneath and the above. A wound, a mouth, a well, a pit. I wanted to make the journey for myself from where the D'ni dug upward, where they almost came to the surface. From the place where Ti'ana first climbed downward, and where Father followed evil into the ground. I began my journey with a heavy burden. It was Ti'ana who came to D'ni, and caused its fall. I am from her. I feel I am destined to bring another destruction. Father and Mother tried to prepare me — tried to tell me who they thought I was. I still see the power of each. I have the best of each — and the burden of each. And as they watched me leave, I saw the sadness and the fear. But more terrifying, I saw their hope. And I left my comfort to find me. And even as I took my first step away from Tomahna, my shoulders ached, for the burden I bore. Deep prophecies and weighty destinies. So much to learn and understand about myself. My father said we can never understand — we can only understand more. The more I understood the more powerful I became, and the more dangerous I became, and the less I understood.
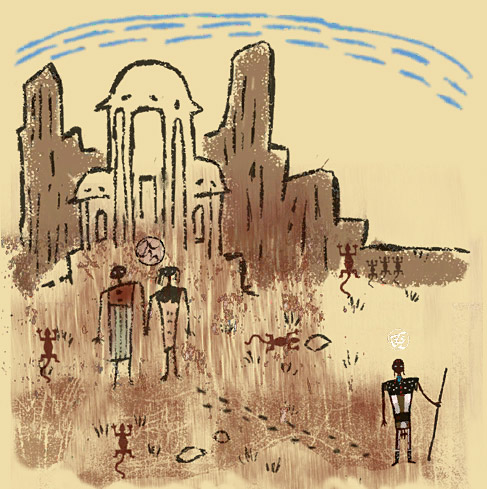
Bahroglyph BC2: Yeesha arrives at the Cleft.
Again a complete
interpretation presents little difficulty. The Yeesha glyph and monogram appear
next to a volcano glyph, also seen in the Cleft (glyph CL5), and above a
depression in which rooms and rope bridges can be seen. The panel contains
numerous depictions of desert wildlife, including a roadrunner (desert bird) in
the lower left, a number of lizards (probably geckos), and an antelope
(possibly pronghorn).
Note that elements of BC1 and BC2 can also be seen in
panel VC7 in the caldera of the Volcano, which is also reproduced on the cover
of the seventh journal of Yeesha in Myst V: End of Ages. That journal is concerned
with Yeesha's departure from Tomahna and desire to spend time at the Cleft. |
Yeesha living in the Cleft. She stayed there for a period
that may have been years before she ventured down into the D'ni caverns.
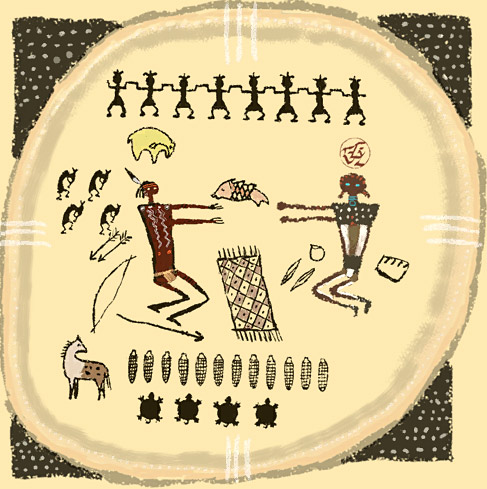
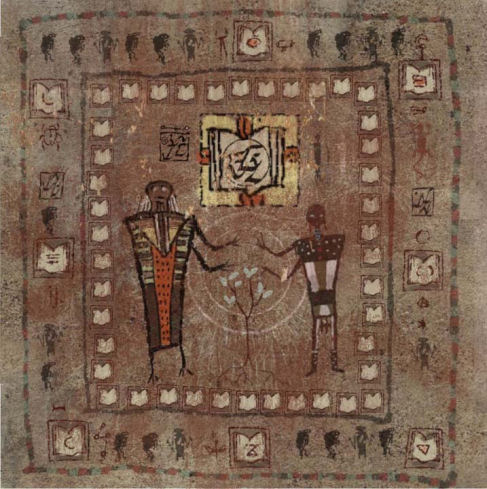
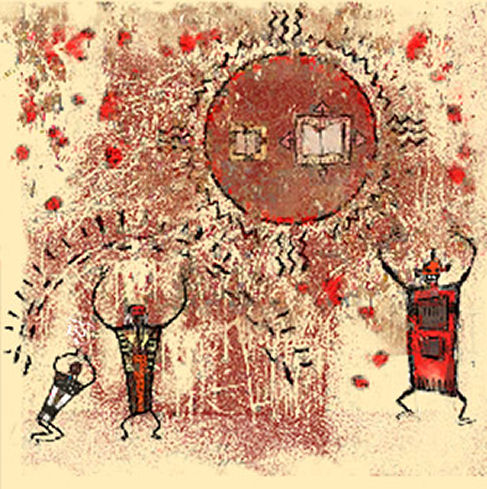
Bahroglyph BC3: Yeesha meets with the local Amerinds.
Ti'chelle Treelawnee has done
extensive analysis of this panel, relating the component glyphs to the symbology of the Hopi, Zuni, and Navajo (Dineh) tribes that resided in that area of New Mexico. For
example, the bear glyph above the head of the figure on the left is probably
his name symbol. A detailed analysis of these symbols is beyond the scope of
this presentation.
It is not clear to me whether the fish is being given to
Yeesha or by Yeesha, or what she might have had to trade to these people.
However, it looks like there are feathers and a paint pot next to Yeesha, and
she may have used her artistic skills to create tradable artifacts, much as
Anna did when living in the Cleft. (See the Book of Atrus.)
Of especial note are the three short, parallel lines at
each of the cardinal points of the panel. The symbolism of these is obscure to
me, but similar elements can be seen in other glyphs, such as BC5. It is
possible they are somehow related to the three strokes of the "crying
eye" or "mourning eye" glyph that will appear in some of the
panels in this series. |
Yeesha trading with local Amerindians for food. Since
Eddy county is located in the southeast corner of New
Mexico, it's quite likely that the natives in question are Shis-Inday or Mashgalénde (bands of the nation called Mescalero
Apache today). This was a practice she would have picked up from the stories
her parents told her of Anna, who did the same when she lived in the Cleft. The
natives would have known from stories that people living in the Cleft had
medical knowledge and other forms of wisdom that would be valuable to them.
The
symbol above Yeesha's head is a monogram of her name. The symbol above the
native in the foreground probably also represents his name, and is a fairly
typical Southwest design representing a bear. Since it is the only object of
its color in the picture, a guess would be that his name was Yellow Bear.
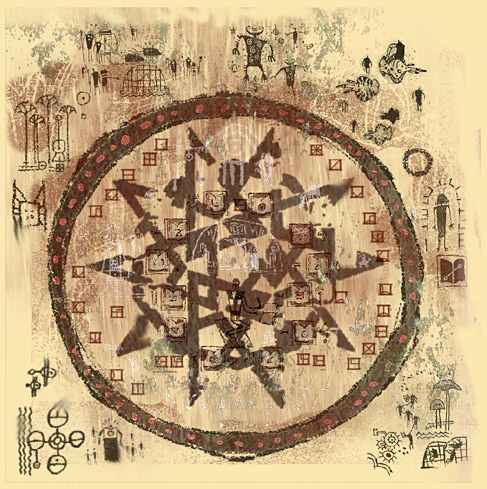
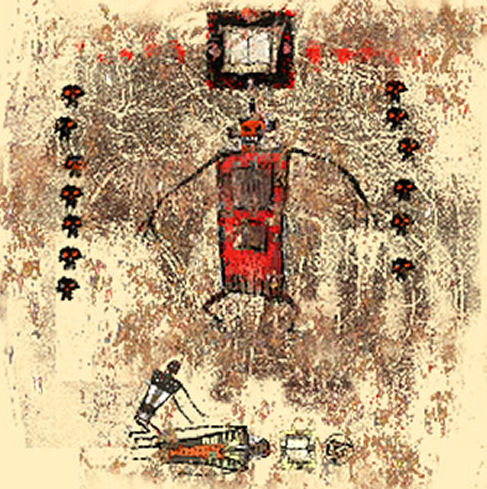
Bahroglyph BC4: Yeesha studying/practicing the Art?
Two different
enhancements of this panel are shown to help bring out some of the varied
detail of this complex image. This is the first panel in the sequence to
present serious difficulty to the interpreter, and almost seems out of order in
the sequence.
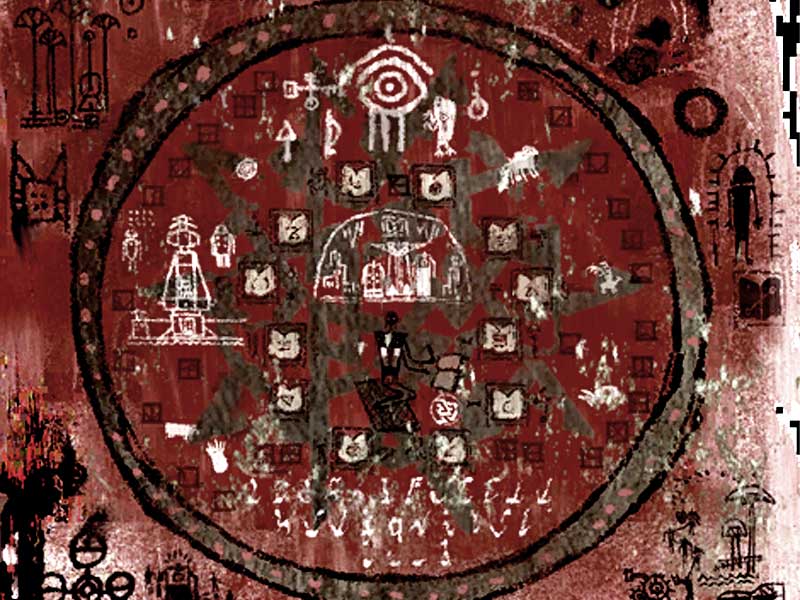
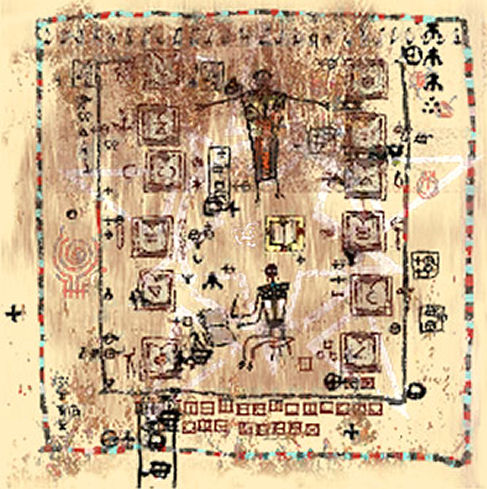
In the center of the panel, Yeesha is writing in a book.
It is uncertain, however, as to whether she is Writing an Age, or simply
recording her experiences. However, the linked star pattern beneath her is also
seen on the floor of the Nexus Age and in various places in the D'ni Cavern,
and may be yet another symbol of the Art.
Yeesha is surrounded by the glyphs of 12 books with
inscribed symbols, which we will see again in later panels. The books are
surrounded by D'ni numerals that do not appear to be numbers of significance,
and there are three lines of D'ni script below Yeesha. Many of the letters are
difficult or impossible to read, but the lines do not seem to form words.
Within the circular frame are a number of remarkable elements
drawn in white, best seen in the second enhancement of this panel.
At top of the frame is the Crying Eye glyph, next to the
glyph of a Bahro that appears to have a Crying Eye on its chest. These elements
are reminiscent of the Bahro Gathering scene behind the bamboo grove in Eder
Kemo (EK6), and are included in many other Bahroglyphs. These two elements are
flanked by symbols that remind one of symbols seen in Noloben.
Between the Crying Eye and Yeesha is a representation of
the D'ni Cavern, which contains the three central figures from EK7, the
mysterious scene to the right of the Journey Door in Eder Kemo. There appears
to be a book symbol (possibly the symbol of the Maintainers) above the head of
the center figure, which also exists in the Kemo version when it is examined
from the proper distance.
On left side of frame is a register that contains
elements of EK4, the Gahreesen panel in the Kemo Fountain Sequence. On the
right side of the frame there appear to be some animal glyphs reminiscent of elements
of EK16 in the Kemo Puffer-Garden Sequence.
With a couple of exceptions, the elements outside the
frame are all related to other scenes found throughout Eder Kemo, including
EK1, EK2, EK5, EK8, EK9, and EK12.
The first exception is the figures in the lower left
register containing the Ahnonay spheres from EK12. The large figure with the
circle on his chest is almost identical to the figure to the right of the
center figure of EK7, but with the addition of a glow around the head and a
number of "follower" figures. These figures are placed closely enough
to the Ahnonay glyph that they are almost certainly part of the same register.
The second exception is on the center right side of the
glyph, depicting a figure in a glowing arch or doorway above a book with a
symbol connecting the left and right pages. Some believe that this is another
representation of Yeesha, as the figure is more similar to the usual Yeesha
glyph than it is to other glyphs representing humans, but I am far from
convinced of this interpretation.
The most difficult aspect of interpreting this panel is
in understanding why the Bahroglyphs of Eder Kemo are represented here, if the
panel is in its proper place in the sequence. By Yeesha's own words in her End
of Ages journals, she did not learn about the Bahro until much later in her
journey, as we will see. Does this scene simply foreshadow the knowledge she is
soon to gain of D'ni history and the practice of the Art? |
Yeesha exploring D'ni and the linking books to other
Ages. The pattern she is
sitting on is the central plaza tile design from a residential neighborhood.
This is a common design found in many other places as well. The symbols
around it are (clockwise from about 10 o'clock): Kadish Tolesa, Rebek, unknown (Amerindian animal-humans?),
Kahlo, unknown (Yeesha?), Teledahn, and Ahnonay. Except for the third and fifth glyphs, these are the similar to glyphs found in the
Age of Eder Kemo.
The glyph has white markings overlaid on it that
are hard to see. If the colors are enhanced, clockwise from 12 o'clock they are: the symbol
for sadness with a Bahro, what appear to be various animals, D'ni letters, and
the Age of Gahreesen. in the center is the D'ni
cavern, and what appears to be the same figures found next to the Bahro portal
gate in Eder Kemo.
This is the courtyard tile design used in the glyph.
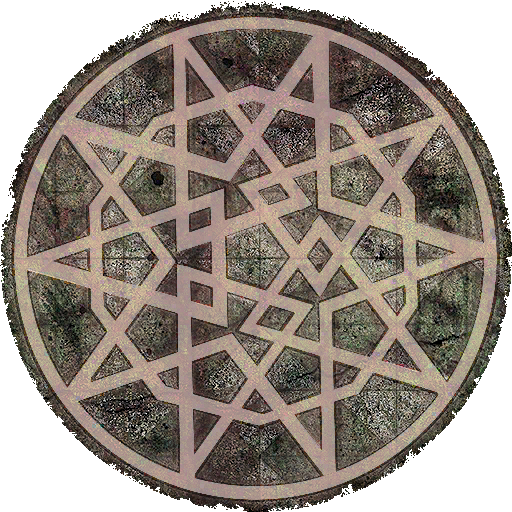
Glyph 4 has markings in white overlaid on it that are hard to see. This is a color enhanced version of the glyph showing the white markings more clearly. Clockwise from 12 o'clock, they are: the symbol for sadness with a Bahro and Bahro writing, what appear to be various animals, D'ni letters, and the Age of Gahreesen. in the center is the D'ni cavern, and what appears to be the same figures found next to the Journey door in Eder Kemo.
It would seem that it was around this time that the Bahro noticed Yeesha, and began to watch her.
BC5-BC10: Life with Calam
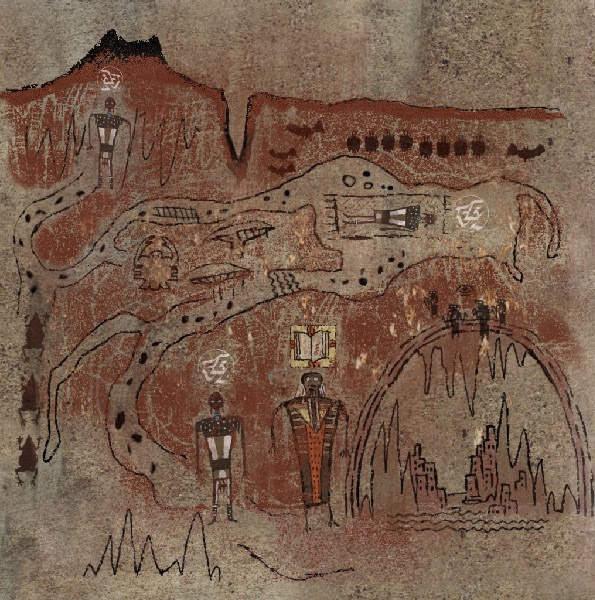
Bahroglyph BC5: Yeesha travels to D'ni.
Yeesha begins her journey by
entering the Volcano at the Cleft, and it appears that she slept at least once
on the long journey. She also encountered some interesting creatures. Bats,
both flying and hanging from the ceiling, are represented in the upper right of
the panel. Frogs seem to be represented on the left side. In the center is some
type of creature that appears to have chelae. Possibly a
variety of scorpion or spider, or some arachnid completely unknown to surface
dwellers.
When Yeesha reaches the Cavern, she meets a person that
scholars formerly called "Teacher" or "Book". We now know,
from End of Ages Journal Eight, that this is a Master Writer named Calam.
Rather than a monogram, Calam is identified by a book glyph, which the Bahro
seem to have typically used to identify Writers, such as Atrus. Note that his
ID glyph has three parallel strokes at each of the cardinal points, as does
panel BC3.
Although this panel depicts Calam as meeting Yeesha upon
her arrival, we know from her journals that she spent a great deal of time
alone in the Cavern before finally encountering Calam in the Library.
A group of Bahro around a Crying Eye is depicted just
above the Cavern. This corresponds to the representation of the Cavern in Cleft
glyph CL6. |
Yeesha meets Calam, a surviving D'ni master of the Art of
writing Ages. It shows her traveling through the tunnel system to the D'ni
cavern, beginning at the Cleft. Yeesha traveled down the Great Shaft to the
tunnels like her great-grandmother, grandfather and father before her. We know from a map of the Journey to the Surface drawn by her great-grandfather Aitrus that the trip takes about three days of walking.
Home was far behind — I was no longer a child. I journeyed deep — deep within myself, deep within the earth, down to the D'ni cavern. I was alone for a time as I consumed my heritage, breathing deep the air of the cavern and the knowledge of my people. But the desire for companionship drove me mad. I engaged a senomar as my confidant, and a tredfish in the harbor became my younger brother. I spoke to them as family and they answered. I swear they answered. Then my mind took a final step into madness when I walked into the library on Ae'gura and saw an old D'ni man on the floor below me. Now I was imagining people to ease my loneliness. But he was no mirage — his name was Calam. And he was a D'ni Writer of Ages.
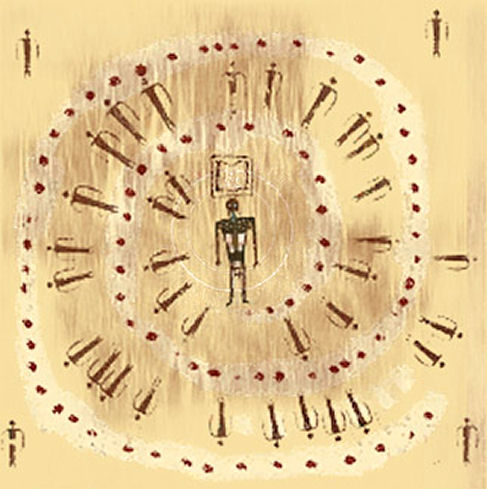
Bahroglyph BC6: Foreshadows?
This is perhaps the most baffling panel
in the sequence, without even the most rudimentary interpretation in which we
can place confidence. It is very unusual for a Bahroglyph to be so uniformly
abstract and symbolic, with few elements on which we can hang the beginnings of
a concrete interpretation, or even a representative name.
For example, some have interpreted the generic human
figures as followers of the Grower on the path of the shell. Yet, at this point
in the story, Yeesha does not know she is the Grower, and has no followers.
Likewise, Yeesha's arrival in D'ni has already been depicted, so it is hard to
interpret this as representing her descent of the Great Shaft, with the smaller
figures symbolizing her progress.
Spirals of various types are probably the most common and
important symbols encountered in Bahroglyph studies, and a spiral is certainly
a central feature of this panel. The same dotted-spiral is seen in Cleft glyph
CL3. The spiral often seems to symbolize a return to beginnings and the path of
water flowing down to the roots of the Great Tree. Perhaps this panel simply
symbolizes Yeesha's return to beginnings, and foreshadows those who will one
day follow her on that path.
Yeesha is surrounded here by a glorious glow (difficult
to see in this enhancement) that we will see again in other contexts in later
panels. Furthermore, her monogram is now contained in a book glyph, a theme that
will be seen again in BC10, but it is a plain book here. Perhaps this
symbolizes her limited knowledge of the Art at this point in her journey, or is
another foreshadowing of later events. |
It's unclear what this glyph
represents, but it may be the concepts and philosophies Yeesha has developed
regarding the writing of Ages. This spiral is shown in a number of Bahroglyphs, and appears to be important to them. The Bahro home world is even named the Spiral Age. We cannot be certain of what the spiral represents because the meaning appears to shift from glyph to glyph. Among others, the spiral is also used in the glyphs for the Relto calendar stone and calendar stars.
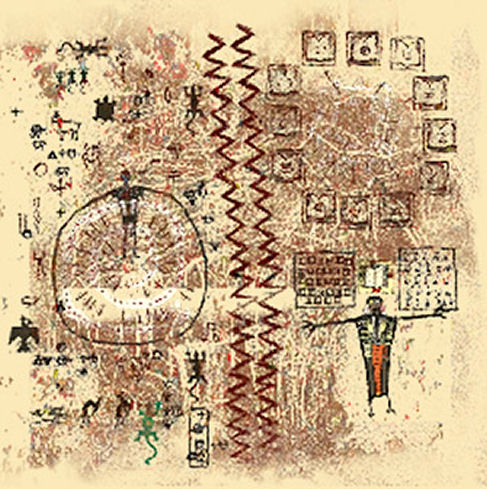
Bahroglyph BC7: Yeesha and Calam
at Odds.
This panel depicts the initial philosophical gap between Yeesha and
Calam. From End of Ages Journal Eight: "Trust did not come easily. There
was conflict between us-between his ancient rules of D'ni that I did not
respect, and my creativity, which he feared. We fought and feared and battled
and screamed ..."
On the left of
the central chasm, Yeesha is again standing on the spiral symbol from BC6,
surrounded by images of desert life and other, more obscure, markings. This
register represents Yeesha's free-thinking, imaginative approach to the Art, drawn
from her heritage and previous experiences.
On the right of the
chasm stands Calam, with orderly tables of the D'ni numerals and letters above
his outstretched arms. Above his head is a series of twelve book glyphs (seen
previously in BC4) arranged in a square. There may be some type of symbol
contained within this square, but it's hard to make out. This register
represents the disciplined, rule-bound approach to the Art followed by the D'ni
Writer's Guild. |
Yeesha and Calam argued a lot in the beginning of their
relationship, according to Yeesha's notes. You see the spiral symbol of
Yeesha's beliefs and a chasm separating it from Calam's ideas, which were all
about the iron-clad rules and traditions of the D'ni Art.
Fighting aside, Yeesha counted herself very fortunate to have met Calam. Her
own training in the Art came from her parents, who were self-taught based on
initial training by Gehn, who himself was self-taught after having only
received a short introduction to Writing just before the Fall of D'ni. Calam
was a fully trained master, and was able to teach her things she would never
have learned otherwise.
Trust did not come easily. There was a conflict between us — between his ancient rules of D'ni, that I did not respect, and my creativity, which he feared. We fought and feared and battled and screamed, until exhausted, we began to learn from each other. We learned of the power of both, just as Father and Mother had done.
Bahroglyph BC8: Yeesha and Calam
at Peace.
Yeesha and Calam work out their differences and begin to study each
other's methods. Again from Journal 8: "... we began to learn from each
other. We learned of the power of both, just as Father and Mother had
done."
Tables of the D'ni
letters and numbers are shown in the top and bottom margins, reminiscent of
something one might see around the blackboard of an elementary-school
classroom. Again, the tables of letters and numerals are also shown flanking
Calam's name symbol.
The same square of
twelve books is shown above Calam's head. However, one of the books has been
moved to the side, and the area in the center has been replaced with some of
the glyphs surrounding Yeesha in BC7. A waterfall of knowledge or enlightenment
appears to be pouring from the center of the square on Yeesha's head, though
her journal makes it clear that the knowledge flowed both ways. |
Calam and Yeesha eventually came to an understanding, and
Calam began to train her, filling in the rather large gaps in her knowledge. By
the end of their relationship, he was learning almost as much from her as she
was from him, which is represented by the symbols of their styles being melded
in this glyph.
Yeesha comments about her parents' training by her grandfather, Gehn. Gehn was always impatient and reckless in his attempts to create new Ages, and often copied passages from different descriptive books to make new ones, and didn't care that the passages were never intended to work together. Because of that, his Ages were almost always disasters. It wasn't until his 233rd attempt that he wrote an Age that didn't immediately begin to fall apart.
So I learned to Write with all the skills that the D'ni had known — beyond what my parents had taught me. For their lessons were given by a flawed instructor and by their own trial and error. I learned to Write from a Master; an opportunity father was never given.
Bahroglyph BC9: Learning
Continues.
Yeesha and Calam become closer. Yeesha's monogram and Calam's glyph
are now side-by-side between the two figures. The twelve book symbols have
spread out and are now more intermingled with the symbols of Yeesha's
creativity. Both of these elements show the growth of friendship and the
blending of their approaches to the Art. However, the background contains an
incomplete version of the Nexus pattern in which the triangles are not fully linked,
possibly indicating that the blending is not yet complete. |
The relationship continues, and Yeesha makes great strides toward becoming a master
of the Art, writing Ages that are wonders to Calam. Her work would also shock and
astonish other surviving D'ni Writers when they were introduced to them later.
Calam's abilities were breathtaking — he knew all the D'ni knew, when D'ni fell. But I taught as well as learned. There were things that the D'ni were forbidden to Write, words they feared, concepts they shunned. Rules and boxes. I had no cultural fear of such things, so I dug deeper, asking questions that Calam could not answer.
Bahroglyph BC10
BC10: Yeesha and Calam
Grow Together. The basic meaning of this panel is clear, though some of the
details of the symbology remain mystifying.
Yeesha and Calam
have fully integrated their philosophies and cemented their friendship. The
name symbols of Yeesha and Calam are now merged, as is also seen in Cleft glyph
CL4. The background (not visible in this version of the image) contains a
completed version of the Nexus pattern. They begin to work together to extend
their knowledge in new directions and begin to grow the tree. Journal Eight:
"... so I dug deep, asking questions that Calam could not answer. And together
we sought answers. That is how we learned of the Bahro and the Tablet. I
learned of power. We grew in knowledge and strength, and Calam became one of my
dear friends."
To the right of the
merged name symbols is another figure that resembles those shown with Yeesha on
the spiral in BC6. To the left is
symbol resembling a square monogram, but it begins with a spiral rather
than a D'ni letter, and the letters do not appear to be a meaningful word in
either D'ni or English. The outer border of the panel contains eight of the
book glyphs from BC4 and BC7-BC9, interspersed with Yeesha's desert-life glyphs
and glyphs representing Bahro. There are also two more of the "square
monograms", neither of which contains a meaningful word.
The most intriguing
element is the glow around the tree, which is the same one seen around Yeesha in
BC6. Perhaps it symbolizes the Grower, in which case its appearance in BC6 is
another instance of foreshadowing. The position of the glow between the
characters may represent uncertainty over the identity of the Grower. Journal
Eight: "I began to think that it was he [Calam] who would be the
grower." |
At this time, Calam begins to believe that Yeesha may be
the Grower mentioned in Words of the Watcher, but Yeesha, who greatly admires his talent with writing, begins to believe that he is.
Together, they finally learn of the existence of the Bahro, and how they are bound to the D'ni Empire by a mysterious stone tablet. However, they may not yet have made contact and learned to understand Bahro communications.
And together we sought answers. That is how we learned of the Bahro and the tablet. I learned of its power. We grew in knowledge and strength, and Calam became one of my dearest friends. I began to think that it was he who would be the Grower.
BC11-BC17: The
Battle Against Evil
These panels present the most dramatic and exciting portion
of the sequence. While the fundamental meaning of the sub-sequence is clear,
each panel contains details that are almost maddeningly mystifying, and
Yeesha's journals from End of Ages are nearly silent concerning these events.
We can only hope that the full story is someday revealed, clarifying the
motives behind the battle and the methods used. |
This is a sequence where Brett began to be especially fanciful. He describes elements in the glyphs as being literal, where I believe they are figurative.
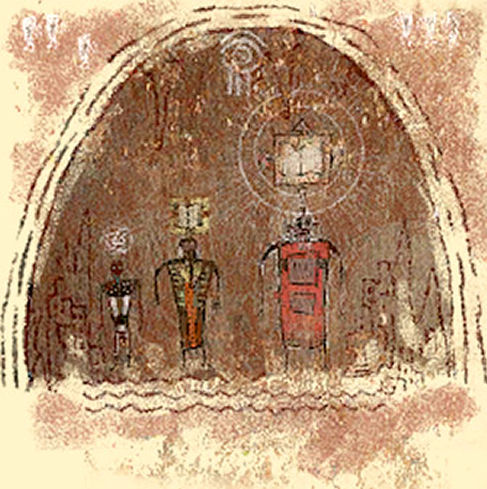
Bahroglyph BC11: Yeesha and Calam
Meet Evil.
Yeesha and Calam meet someone new in the Cavern. The meeting appears
peaceable, suggesting that the pair did not suspect the hostility that the
newcomer would eventually reveal. The new figure is typically referred to as
"Evil Book" or "The Enemy", and has not yet been
identified. He appears to be a Writer, since his ID glyph is a book with
outward-pointing arrows at the cardinal points, but Yeesha's journals do not
name him. Remarkably, he also appears to be wearing some type of headgear or
helmet.
The depiction of the
Cavern follows the usual symbolism, with the Crying Eye at the top of the
Cavern and groups of Bahro above the roof.
Again the intriguing
glow makes an appearance in this panel, but it now surrounds Evil Book's ID
glyph. If it symbolizes the Grower, then perhaps Evil Book is someone who
believes he is (or is pretending to be) the Grower. The book is already bigger
than that representing Calam, and the arrows suggest a
desire for expanding domination. |
Calam and Yeesha meet another Writer in the caverns. The
larger book symbol with the halos and radiating lines may indicate he was a
surviving guild master of the Guild of Writers. Yeesha never mentions his name
in her notes. At the very least, it probably indicates that the person was important and outranked Calam.
Some explorers who have studied the glyphs nicknamed this
person "evil book", but there is no proof at all
that he was evil. However, it's certain that the encounter was not a
good one, since the scene is surmounted by the Bahro sadness symbol.
But evil will find you, even in the depths of the earth, and Calam was murdered.
Bahroglyph BC12: Evil Book
Attacks Yeesha.
Evil Book finds Yeesha alone and uses the opportunity to strike
at her. Again the glow surrounds Evil Book's ID glyph, but now it is black
rather than white.
Six books are depicted
on the Enemy's side of the panel. Was the Art somehow involved in the conduct
of the attack? What is the significance of the crossed-lightning bolts arching
towards Yeesha? |
The man seems to be angered by Yeesha, probably because
she is not following the laws of D'ni and rules of Writing that the Guild and
had used since the founding of the caverns. I believe the markings represent rage and possibly a verbal attack, rather than a physical attack.
Bahroglyph BC13: Calam Joins the
Battle.
Calam steps in and protects Yeesha.
The ID glyphs of Calam
and Evil Book are juxtaposed within a circle that appears to be radiating
energy. Perhaps this symbolizes that the contest was a Writer's duel of some
type, though the historical record does not give us any indications that such
events occurred. There are three parallel wavy lines at each of the cardinal
points of the circle, which may be related to other occurrences of the
three-line symbology. Yeesha doesn't seem to be
helping, as her monogram is over her head, rather than being in the battle
circle.
Calam appears to be
producing some sort of protective force field, similar to the one seen in EK7 in
Eder Kemo, but the symbology is once again enigmatic,
leaving us unable to explain the true methods of attack and defense that were employed. |
Calam leaps to Yeesha's defense, and redirects the man's
anger to himself. The arch of lines may represent his attempt to shield Yeesha
from the man's anger. The idea that he was employing a "force field" to protect her is highly unlikely. While force fields were not unknown in the D'ni Empire, there are only two places we can find them now: the Jalak playing grid and the Space Pod orbiting the planet in the Todelmer Age.
Bahroglyph BC14: Calam is Killed.
The skulls on the borders of the panel are typical
symbols of death, and Journal Eight states that Calam was murdered, so the
panel clearly indicates more than simple defeat or injury. Evil Book's ID glyph
is now bordered in black, another symbol of death. The meaning of the red dots
flanking the glyph (five on each side) is elusive.
Yeesha's monogram is
now dark instead of light, and is positioned above Calam's ID glyph, rather
than within it or over her head. As well as symbolizing her sorrow over losing
someone so close to her, the color may also symbolize feelings of guilt. In
Yeesha's third imager speech in End of Ages she says, "Did I ask to cause
the death of Calam?" Would Calam have been left alone if he had not
protected Yeesha? Or does her guilt run deeper than that because she is somehow
responsible for the circumstances that led to the attack or made it possible? |
The enraged man kills Calam. This was the second traumatic event Yeesha experienced in her life, and was fundamental to her later actions. She became guilt-ridden,
believing that it was her fault that Calam died. There are many hints that she never
got over it.
The first event that scarred her personality was a betrayal by her older brother, Sirrus, who used a mechanism in the Age of Serenia to rip her mind from her body and attack it in a mental realm called the Dream. He did that as part of a plan to take over her body and trick their father, Atrus, into teaching him the Art. The plan was to kill Atrus and Catherine after learning all he could from them, so that he could build a personal empire of Ages to exploit and rule over. The plan failed when their eldest brother, Achenar, decided to oppose Sirrus and rescue Yeesha.
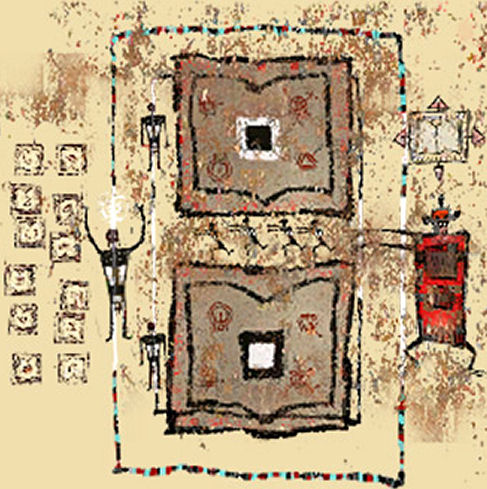
Bahroglyph BC15: Yeesha Continues
the Battle.
Yeesha finds the courage and ability to continue the battle against
Evil Book on her own. Journal Nine: "I learned of the fearsome power I
wield on that day-the day of Calam’s death."
Evil Book appears to
be sending minions of some kind to carry out his attack. Are these outworlders (ahrotahntee) that he has either enslaved or
allied himself with? They do not resemble the usual glyphs representing the
Bahro. Or is this symbolism meant to be as abstract as the lightning bolts and
the defensive shield in the prior panels?
The twelve books
usually associated with Calam are depicted to the left of Yeesha. This may
symbolize Yeesha's use of Calam's knowledge in the battle, which more clearly
involves the Art in this panel and the next.
The two books in the
center of the panel appear to be Yeesha's mode of battle, as a small image of
Yeesha is shown next to each. The four symbols on the pages of the top book
appear as mirror images on the bottom book; the colors of the squares in the
top book are reversed in the bottom book; and the two books are linked by
lines.
Most likely this is a trap
of some kind, intended to trick Evil Book and/or his minions into choosing the
wrong Age out of a pair that superficially seem to be duplicates. |
In her grief, Yeesha attacks the man. It's not clear how
the battle was fought, although other explorers have published theories. This
glyph seems to imply that Yeesha attempted to trap him in prison Age by luring him with at least one book that was legitimate. One thing is certain — there was no "mystical" aspect to the fight, since there is no records that indicate such a thing was possible. Instead, it might have been a deadly game of hide and seek, jumping from Age to Age. Since she was apparently trying to trick him into using a trap book, that's one way she might have done so.

Bahroglyph BC16: Yeesha
Triumphant.
Yeesha wins the battle against Evil Book. According to Journal
Nine: "In a fit of rage I destroyed the murderer..." However, the
bottom portion of the panel seems to show Evil Book as simply being trapped in a
book bearing the dark-in-light square from the top book in BC15. It is not
clear whether Yeesha's use of the word "destroyed" is exaggerated, or
whether the symbology simply fails to indicate Evil
Book's true fate. Evil Book's ID glyph is either missing or has shrunk
considerably.
The triumphant Yeesha
is now depicted with the glow symbol, more radiant than ever, around her
monogram. This adds support to the interpretation of the glow as representing
the Grower. Journal Nine: "I began to see that the prophecies of he Grower might speak of me", though previously she
had thought that Calam might be the Grower.
As in BC9, the glyphs
and symbols of Calam and Yeesha are mingled on the left and right borders of
the panel, indicating the full range of her knowledge. |
The idea that she was trying to trap Evil Book in a prison Age is supported in this glyph. In the end, Yeesha won, and the man is shown
trapped in a book.
Yeesha wrote about that day in one of her journals found in the Great Shaft. The entry shows that the events of that day caused a shift in her thinking and personality. Instead of being focused on learning about her D'ni heritage and learning to be a better Writer, she becomes obsessed with the Bahro and freeing them from D'ni. After her victory over Evil Book, she was approached by the Bahro and learned to speak with them. They began teaching her their methods of Writing and linking. This gave her the last key to unlocking her true ability as a writer, as she integrated their techniques with those of her parents and Calam. This resulted in her being able to safely make changes to existing Ages, travel through time, and perform many other feats that the D'ni would never have thought possible. It also made her supremely arrogant and much more impatient than she had been before.
Yeesha found the path she needed to follow to free the Bahro from their enslavement by the stone tablet. The tablet was intangible to anyone who had not followed that path and activated four daughter tablets. Completing the path allowed the aspirant to pick up the tablet. However, once she had it in her hands, she thought only of using it to correct all the flaws she believed existed in the world, and that selfishness caused it to return to its intangible state.
Power is a gift. Power is a curse. I learned of the fearsome power I wield on that day — the day of Calam's death. In a fit of rage I destroyed the murderer, and I destroyed my innocence. And again I learned that most things cannot be returned to how they were. And my power continued to grow even as I began to see that the prophecies of the Grower might speak of me. My destiny began to be fulfilled. But there was still more. The Least. Abused. Mistreated. Misunderstood. Ignored. They were mocked and scorned and their hearts still show their pain, but they continue to serve. Such power they have, and yet they serve. They treated me with kindness, and I learned from them. They respected what I was becoming. With them I learned new laws, new rules, and new powers. I used the powers to care for a tree to come, and the Tablet allowed me to grow beyond Ti'ana, beyond Father and Mother, beyond D'ni, beyond Calam. The Tablet held them. The Tablet chained them. The Tablet held me. The Tablet empowered me. I watched with them. I waited with them. I learned with them. I called them from captivity and grew while they gathered. Together we became both weak and strong. And then my time came. My time to take the Tablet. My time to choose. I was ready. I felt the pull of holding it, of channeling and releasing the full power of the Bahro. I would right the wrongs. I would set things the way they should be. I would choose well — I could not fail. I am the Grower. I was so sure, so strong, so wise, but I didn't open myself and listen to the Maker. The noise of me drowned his quiet voice. And I failed. Failed to see anything beyond myself and what was obvious. And pain came quickly, when I realized what I had done. The tablet returned, and the Bahro continued to serve. The pain still burns me. But the powerful Bahro simply wait and serve. Pain is often how we learn. But it is not for us to give — we are not the teachers. We must not abuse them. We must not abuse the Bahro.
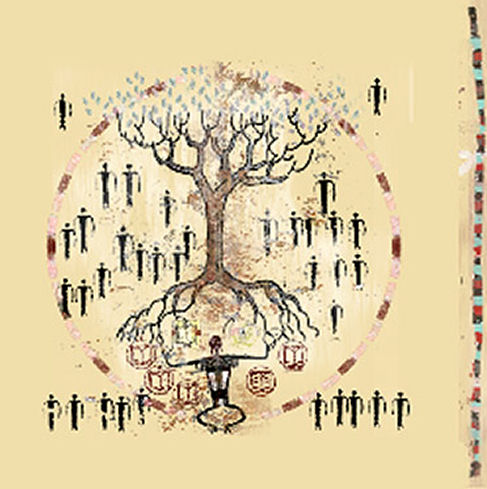
Bahroglyph BC17: Yeesha Gathers
Followers.
The Called come to the Cavern and learn from Yeesha. Yeesha's
monogram and Calam's ID glyph appear separately above her shoulders as she sits
at the root of the Tree and beckons. Five book symbols appear below Yeesha's
arms, but most of them appear blank. Perhaps the filled book represents the
past, while the empty books represent the unwritten future. It seems odd that
the glow and the spiral do not appear in this panel, which would help to
confirm my tentative interpretations, and that no Bahro figures are depicted. |
After her failure with the stone tablet, Yeesha found out that once you've touched it, you can never touch it again. She had to find another way to free Bahro from its influence.
This glyph probably represents Yeesha enacting her second plan, which was
to call explorers to come and follow the Journeys. This plan involved tying a Bahro's soul to four ceremonial pillars, which an explorer would move from D'ni to break the binding, then return to restore the Bahro's spirit to its body. This plan was probably inspired by Words of
the Watcher, in which the Watcher refers to people he called the
"gathered".
From Words:
The door lies at the end of the path.
Who will gather? Many.
Who will finish? Few.
The action of the gathered means nothing.
The action of the deceived is toiling in vain.
When the tree dies there will come a new one.
A grower to learn of the death.
A grower to see new life.
A grower to bring the gathered.
A grower to restore the least.
A grower to move through time.
A grower to link at will.
A grower to follow the shell.
A grower to banish the darkness.
A grower to graft the branches.
A grower to join the paths.
You toil and strive to write Ages and move stones.
The path of the stone is toil for the gathered.
Do not fear the wound, it is a way of peace in time of need.
A place of patience;
A place of stone;
The gathered are known by their faces of stone.
A place to fall;
A place to be raised;
The gathered will fall into the wound.
Do not put out the least for they will save you.
The gathered will tell of the path of the shell.
The bound will know of the path of the stone.
Words are many, but action is what is desired.
The gathered will find rest when the light comes.
The dreams of the wise are a gift from the Maker.
The cleft is a blessing to the gathered.
Contempt is a gift from the accuser.
Roll the stone to know the deceiver.
Yeesha eventually lost patience and became angry over the slow progress
of the plan, and went to far as to insult the Called
who did not respond or who did not finish the Journey in a recorded message she left in the Great Shaft. Her exact words were "Have I
not become the Grower? The Grower... Yet all I grow is anger. Watching them
call, watching them fail, waiting and watching. I am the Grower! How can I wait
much longer on such fools?"
A theory has been proposed that the people who hear Yeesha's
call have a trace of D'ni ancestry. The possibility exists because a number of
workers vanished early in D'ni history while digging air ventilation shafts to
the surface. However, it's purely speculation, and there is no evidence that
supports or refutes it. It goes along with an idea that the Amad people, whom
Gehn was visiting when he met and fell in love with his wife Keta, were descendants
of the missing D'ni workers. Again, there is no evidence to support or deny the
idea.
Who is Evil Book?
To close this analysis I would like to venture deep into
speculative waters and offer a suggestion regarding the actual identity of
"Evil Book". My discussion will explore the supporting evidence for
my contention, but will make little effort to be "fair and balanced",
though much of the evidence is certainly capable of other interpretations. Be
warned: my previous theory regarding the identity of "Teacher" was
quickly exploded by the release of End of Ages, so my track record is not good.
I strongly suspect that Evil Book is none other than
ex-Guild Master Kadish. My suspicion begins with Yeesha's apparent fixation on
this character. His Age of Tolesa is one of the four primary Ages chosen to
present the lessons of Yeesha's first Journey for the Called. His life
permeates the lessons of the second Journey along the Path of the Shell, and
his death and re-birth are intimately involved with the climax of that Journey.
What makes this defrocked Writer, minor merchant, and
pathological liar so important?
From Yeesha's Bahro Cave speeches in Uru:
Ages Beyond Myst: "Only death can conquer pride
so strong ... for Yeesha, it was death that moved me to return." I submit
that the source of her pride was the power she gained through her studies with
Calam, and it was only Calam's death that could shock her out of it, making
this statement a reference to the battle in this sequence.
Yeesha feels responsible for the death of Calam, though Evil
Book killed him. From Yeesha's third imager speech in End of Ages: "Did I
ask to cause the death of Calam?" I believe her pride led her to an act
that ultimately resulted in the battle with Evil Book, which is why she feels
responsible, and why Calam's death was the cure she needed. If she did not feel
responsible, then Calam's death would simply be a tragedy and not a lesson, and
she has already told us that the lesson of death is about the consequences of
pride.
When did this prideful act take place? I suggest that her
pride was at its greatest height in the first flush of discovering her power,
as she learned from Calam and taught him.
What was this prideful act? The torn note written by Yeesha
and found in Kadish's empty vault is plainly written by someone in the grip of
a pride that borders on megalomania. From the fourth fragment: "These are
the powers of gods and I now have this power." This note suggests that
Yeesha saved Kadish's life during her prideful period. Did Yeesha then just
leave him in the vault with no option but to link back to D'ni and die there?
Just to give him a "nobler" end than the one he originally chose for
himself? Even that would demonstrate incredible arrogance on her part, but it
seems unlikely. I suggest that she brought him forward in time to make use of
his undoubted skills in the re-birth of D'ni, so his end would not be the waste
that she considered it, based on her scrawling on Kadish's last testament.
Yeesha's victory in the battle also resulted in a loss of
innocence, according to her journals. In addition to pride, was innocence
required to motivate Yeesha's actions in the vault? I think the answer to that
is "yes". A sophisticated person would have thought twice about using
such wondrous power to alter the history of someone
of Kadish's character. I believe it took a significant degree of naivety to save his life long after his death, and that
Yeesha was then naive enough to expect lasting gratitude and respect from the
Deceiver. This again suggests that the rescue of Kadish took place prior to
Calam's death, as Yeesha no longer had such innocence afterward.
The vault note is in fragments. Why? I believe that Yeesha
later tore it up in angry remorse, because her prideful act of saving Kadish's
life went tragically wrong. If she had simply saved Kadish's life and let him
go his own way, or if Kadish had gone on to do good works and be kind to widows
and orphans, I don't see what reason she would have had to revisit the vault,
to tear up the note, or to add Tolesa to her list of lessons about pride and
death. Her proud act would have justified itself in this case. But these things
become understandable if her act turned out to be a major mistake with a deadly
impact.
The "glow symbol" suggests that Evil Book
considered himself to be the Grower, or was at least a pretender to the Grower's
powers, assuming my interpretation of the symbolism is correct. This
description certainly fits what we know of Kadish. Thus, Kadish would have had
a strong motive to attack Yeesha and/or Calam, once he found out that one of
them might be a competitor for the title. This is especially true if Kadish had
actually deluded himself into believing he was the Grower. His hunger for power
would have led him to try to wipe out any potential challengers, and he
certainly couldn't have deceived Yeesha or Calam into becoming followers.
Kadish was originally a Writer, as Evil Book seems to be.
Evil Book's red costume is suggestive of the red cloak on Kadish's skeleton,
and the pictured headgear is suggestive of the helmet found in the alternate
vault. While these parallels are far too thin to stand on their own, I believe
they do add to the weight of the other evidence. |
Brett Middleton's theory about Kadish being Evil Book is an attractive one that is popular among explorers. However, I don't believe it is true. There are several reasons, but the most compelling one involves the time travel aspect.
We know from her journals that Yeesha did not learn the Bahro version of the Art, which allowed her to circumvent time, until after Calam was murdered. This means her project to rescue Kadish took place well after
Calam died. I simply cannot believe that Yeesha would have
gone back in time to the Fall of D'ni and rescued Kadish just so she could bring him forward in time
to murder her mentor. That's an event she would have known would happen, so why do it?
There is also the statement she made about meeting the Writer nicknamed Evil Book. She said, "But evil will find you, even in the depths of the earth, and Calam was murdered." The key is how she phrased it. She said that evil found them, not that she brought evil to them. If she truly blamed herself for the event, I think she'd have said so.
In the end, though, it's up to each and every one of you to decide for yourselves what you choose to believe about that event. All that really matters is that it was the second traumatic event in her life, and was the straw that broke the camel's back. It was instrumental in driving her to hate her D'ni heritage. Up until then, she seems to have been objective with her views of their society. Afterward, she hated everything D'ni with a passion, and tried by means of slanted stories and outright lies to make explorers hate them too.
|

